Cycle Torch Shark 500 Bike Light Review

Cycle Torch Shark 500

Last week I reviewed the Cycle Torch Night Owl, an affordable, bright light designed for bike commuting. This week I’m taking a look at its big brother: the Shark 500.

I’ve been really impressed with this light and both myself and my husband have been using it on our bikes. In fact, my husband loves it so much that he’s come up with a way of attaching it to the headband he normally uses for his heavier, battery-pack torch so he can use it for night orienteering.

Cycle Torch Shark 500: Vital Stats

Weight:
Lumens: 500
Modes: 4 (3 levels of brightness + flash)
Run-time: 1.5-30 hours
Where to buy: In the UK, it’s available from Amazon.

First Impressions

Shark box 1
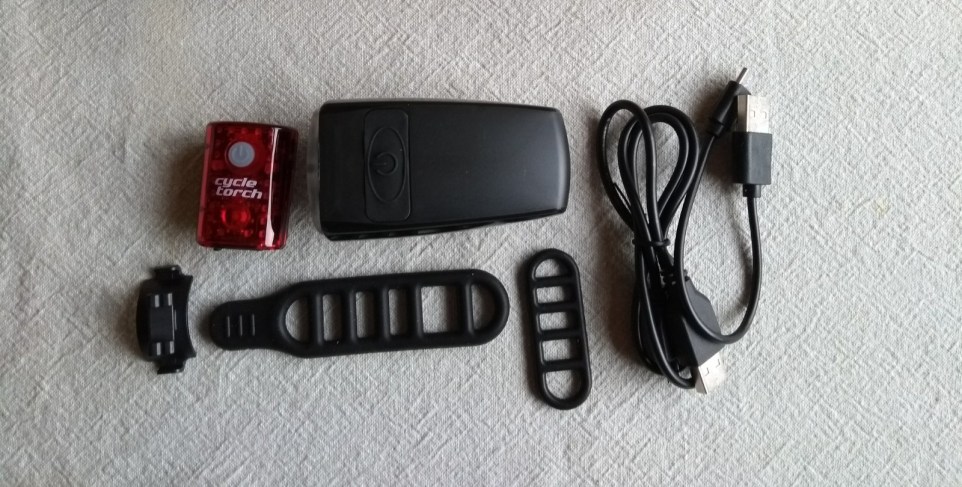
The Shark comes in a simple but stylish box. Open it up and you get a thank you note from the company, underneath which is the torch, neatly packaged in foam casing. In fact, you actually get two torches – Cycling Torch throw in a rear light to give you a bit more for your money. Also in the box are three attachment straps of different lengths and two USB charging cables. There’s no instruction manual, but you can download one online.

Shark box 2
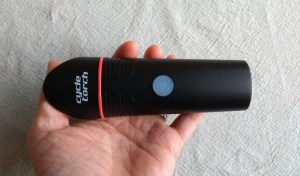
For a low-cost bike light, the Shark is pretty stylish, if a little on the large size. The front end is unusual for a bike light in that the plastic casing extends over the light itself. More on this later.

The Shark 500 has an IP65 water resistance rating. This is defined as “dust tight” and protected against water projected from a nozzle. The weak point in terms of water resistance – the USB charging point – has a thin rubber cap to seal it from the elements. Which I somehow managed to pull straight out of the torch body. (Tip: don’t do this, it’s a complete pain to fiddle back in.) It works but is a bit awkward – the thicker plug on the rear light is much easier to secure.

Shark frontBoth the main torch and the rear light are charged via USB. They charge quickly, the main light back to full power in around four hours. The power button on the Shark glows red when charging and switches to blue when fully charged. The rear light glows green when fully juiced.

If you read the manual (or this post) you’ll discover that by pressing and holding the power button, you can find out how much charge the torch has left. 10 flashes indicate 100 percent charge, 9 flashes indicate 90 percent charge, and so on.

Setup and Bike Attachment Points

Both the front and rear lights attach using the rubber straps provided. The rear light is super easy to get on and off, the front light slightly less so. Both feel secure once on, even when riding on bumpy paths. I haven’t had them long enough to test the longevity of the bands but they seem pretty rugged.

Testing in the Dark

Right, now we’ve got the preliminaries out of the way, let’s get on to how it does in action. I took the Shark 500 out on a ride on local, averagely-lit roads (I don’t live in the city) and down the local canal to test it in an unlit environment.

Shark rear lightThe Shark 500 has four modes: high (500 lumens), medium (250 lumens), low (50 lumens) and flash. Both the high and medium settings are bright enough to light your way on roads in partially lit areas. The 500 lumens setting was also great for off-road riding. It’s not bright enough for fast downhill or really rough mountain biking but it’s definitely a step up on the Night Owl.

With most bike lights you get a circular light but the Shark is different. The plastic casing cuts off the beam at the top and bottom creating a rectangular beam of light. The cut off at the top helps focus the beam and prevents you dazzling oncoming cyclists or drivers. Having been dazzled myself plenty of times in the past, I appreciate this! However, the plastic casing on the bottom is not so helpful. It limits the field of light so you can either focus on the ground around your front wheel or further ahead. Logically, you have to go for looking ahead, which on the road is fine, but for off-road biking, I’d have liked to have a wider field of vision.

According to the manual, you get 1.5 hours of light on the top power setting. I actually got a lot longer this – about 2 hours and 40 minutes. The torch flashes and the power button turns red to warn you you’re low on charge twenty minutes before it gives out. On the medium setting, you get three hours of light, and for most bike commuters the 200 lumens will be bright enough.

The rear light isn’t bad, but you’ll probably want a dedicated rear light if you spend a lot of time biking in the dark. The battery life on this was disappointing. It’s supposed to last two hours on the brightest setting, but after an hour and forty minutes the beam faded and pulsed. It stayed on for another hour but not really at a usable level.

Summary

For the price point, the Shark 500 gives you a lot for your money. It’s much brighter than the Night Owl and definitely a better option if you cycle on unlit roads or off-road tracks. For technical mountain biking at night you may need a brighter (and more expensive) light but as far as value for money goes, the Shark 500 gets top marks.

Full disclosure: Cycle Torch provided me with the Night Owl light to test. This review is my honest, unbiased experience of using the bike light.

Cycle Torch Night Owl Bike Light Review

Cycle Torch Night Owl

If you’re looking for a bright, affordable commuting light then the Cycle Torch Night Owl is one of the best value models currently available. It’s a USB rechargeable bike light (plus one for the environment!) and comes with a “bonus” MicroBot rear light. The Night Owl is a lightweight model that’s bright enough to both see and be seen on most roads and gravel tracks.

Cycle Torch Night Owl: Vital Stats

Weight: 80g
Lumens: 200
Modes: 4
Run-time: 2-20 hours
Where to buy: In the UK, it’s available from Amazon.

First Impressions

Night Owl box 1The Night Owl is neatly packaged. When you first open the box, a big “Thank You” message is the first thing you see. I was expecting this to be an instruction sheet, but this appears to be the one thing you don’t get with the light. Still, at least it saves some trees. (If you’re the sort of person who enjoys reading manuals, you can find it online here, along with some simple instruction videos.)

Night Owl Box 2The light itself is neatly wrapped and tucked into a custom-cut foam casing. This is actually a set of lights: along with the main front light, you also get a “free” tail light, which is nice. Also in the box are two USB charging cables, a plastic mount for the rear light and two rubber straps to attach the lights to your bike.

The torch is lightweight and looks and feels… like a torch. This isn’t a beauty parade, but it’s not a bad looking thing. The power button is front and centre on the top and on the underside, there’s a curved mount and the USB charging point which is protected with a rubber cover.

The torch has an IP65 water resistance rating. This is defined as “dust tight” and protected against water projected from a nozzle. What this means in reality, is that it should cope with heavy rain showers, but don’t drop it in the canal.

Charging is quick and easy – just plug the USB cable into your computer or a USB charger and away you go. It took just over 1 hr 15 mins to fully charge the main light from empty via my laptop (much quicker than the suggested 4 hours). The small rear light took 1 hr 35 mins. Both lights glow red when charging and blue when fully charged.

Incidentally, if you’re worried about charge levels, there’s a neat setting you can use to test how much charge you have left. If you press and hold the power button for a few seconds the light will start to flash. 10 flashes indicate 100 percent charge, 9 flashes indicate 90 percent charge, 8 flashes indicate 80 percent charge, etc. etc.

How did I find out about this? By reading the manual. Sometimes it pays to be a geek.

Setup and Bike Attachment Points

Night Owl back lightUnlike some lights, the Night Owl doesn’t have a separate mount that needs to be screwed onto your handlebars, which means there’s virtually no setup. You just whack the light on and snap the rubber band around the handlebar to secure it. It’s a bit too fiddly to put on with gloves, but the band has a tab which makes it super easy to take the light off, even if you’re wearing winter gloves.

The tail light is slightly different. You attach the mount to your seat post using the smaller rubber band and then slot the light down onto the mount. This means you can leave the mount on the bike and easily remove the light. I guess this is what it’s designed for, as unlike the front light, the rubber band attached to the mount doesn’t have a pull tab and is a bit of a pain to get off. A tab addition would make this significantly easier and save me having to spend five minutes hunting around in the dark, trying to find where the rubber band pinged to.

The rubber bands seem to hold the lights on securely. As for longevity, time will tell how long the bands last.

Testing in the Dark

So, onto the fun stuff! How does it perform? I took it for a ride on local, averagely-lit roads (I don’t live in the city) and down the local canal to test it in an unlit environment.

The Night Owl has four modes: high, medium, low and flash. High mode is a bright 200 lumens, medium is 100 lumens and low is 20 lumens. I’m not sure when you’d ever use it on low unless you were desperate to save battery, but both high and medium modes are bright enough to be seen by and to cycle in lit areas. The high mode is blinding enough to make sure that any oncoming cars will know you’re there.

I was also impressed with the brightness of the torch on unlit tracks. I took my mountain bike out to the canal and the light was perfectly adequate for cycling on the flat, wide path. It wasn’t so great on a rough downhill section, but to be fair, it’s not designed to be a mountain bike light. Equally, if you’re a speedy road cyclist, you may find it’s not quite bright enough to give adequate warning of approaching hazards.

Cycle Torch claim you’ll get 2 hours of light on high power. When I tested it, I only got 50-75 minutes which was a little disappointing, but should be enough for most commutes. This is where the provision of two USB charging leads comes in handy. You can keep one at home and one at work to top up your light as and when needed.

The mid power mode supposedly gives you four hours of light and the flash mode 20+ hours. If you cycle on lit streets where you’re more worried about being seen than lighting up the road, then the flash mode is a good option to save you having to remember to charge the light every day or two.

Summary

The Cycle Torch Night Owl is a great little torch that’s perfect for commuting and easy off-road cycling (e.g. gravel tracks) at a slow-moderate pace. The only downside for me is that, on the model I tested, the light time didn’t quite live up to expectation. The addition of the tail light makes this a great buy and in terms of value for money, this bike light can’t be beaten.

If you’re looking for a brighter light for dark lanes or off-road use, I’ll be reviewing the Shark 500 next week!

Full disclosure: Cycle Torch provided me with the Night Owl light to test. This review is my honest, unbiased experience of using the bike light.

Five Ways To Beat the January Blues

Beat January Blues

Tomorrow is the final day of January and, for me at least, it can’t come soon enough. I’ve written before about how I struggle with the winter months and the last month has felt particularly gloomy and miserable. Day after day of rain and grey skies with just fleeting glimpses of blue skies and sun. People who suffer from Seasonal Affective Disorder (SAD) can really struggle at this time of year and even the most cheery and optimistic of us can fall prey to the odd bout of the January blues.

At this time of year, all my body seems to want to do is sleep. And even when I sleep well, I still wake up feeling lethargic and tired. Getting outside to exercise often improves my mood, but just working up the energy to get togged up in my layers and get out can sometimes feel too hard. Rather than looking forward to the year ahead, my mind is prone to dwell on all the things that are wrong with the world, rather than all the things that are right. I think of what I should be doing, how I should be a more positive person, why everyone else seems to be achieving more than me. At this time of year perhaps more than any other, I struggle to avoid comparisonitis.

I don’t have a solution to this. (If anyone does, please let me know!) But over the years, I have figured out a few things that make me feel better, if only for a while, and help to banish those January blues.

Make the Most of Sunny Days

It doesn’t feel like we’ve had many, but at this time of year, you have to make the most of whatever sun you can get. It can be frustrating if you work full-time in an office and the sun only seems to come out during office hours. But even just half an hour in the cold winter sun can help improve your mood.

The same is true on the weekends. I scour the weather forecast, searching for any sign of sun. If the weather’s looking good then make the most of it. As I try and tell myself, the cleaning can wait for a rainy day.

Escape to the Sun

This is many Brits’ solution to dark dreary January days. In previous years, I’ve usually booked a climbing trip to Spain during the first couple of months of the year. Not only does this give me the motivation to get down to the climbing wall and train over the winter, but it also allows me to feel the sun’s warmth on my skin for a few days.

This year, we decided to stay in the UK and will be touring southern England in our campervan in March, praying for good weather.

If you’re lucky enough to be in a position where you’re not tied to one location because of family commitments or work, then why not temporarily relocate to a warmer climate for some of the winter months?

Embrace Hygge

If you can’t get away, then there’s nothing for it but to make the best of the winter weather. This means embracing the dark nights and the wind and rain lashing on the windows (it’s atmospheric, right?) and making your home is cosy as possible. Light some candles, put on some relaxing music and spend the evening curled up with a good book.

Get Outside, Even If It’s Raining

Even if the weather isn’t great, I still find it helps to get outside of this time of year. If I’m feeling sleepy and lethargic, then there’s nothing like lashing rain-soaked wind in my face to wake me up! A quick walk, run or spin on the bike will get your blood moving and give you a much-needed boost of energy.

Plan An Adventure

Another good use of dreary January days is to spend time planning and preparing for your next adventure. Or adventures – why stop at one! It always cheers me up to have something to look forward to and planning the details of a summer adventure can make the dullest day seem a little brighter.

What are your tips to get through the January blues? Let me know in the comments or on Twitter!

Five Reasons to Love Walking in the Rain (+ 5 Top Tips)

Hiking in the rain

I love the lush, green British landscape and welcome the change of seasons and the variety this brings to my life. But sometimes, I wish it didn’t rain quite so much! Since the start of the new year, rain has been the dominant theme of our weather here in Yorkshire. But has that stopped me getting outside? Has it hell! Given the choice between a dry, bright day and a rainy one, most of us would choose to walk in the former. But there are reasons to enjoy walking in the rain, and at least one of them should make you force yourself outdoors whatever the weather.

Here are a few of the reasons why I love walking in the rain, plus my top five tips to make hiking in bad weather less of a chore.

1. Bad Weather Walks Can Be the Most Memorable

Now, I have plenty of memories of beautiful walks throughout my life. But some of the experiences that really stick in my mind have been the wet weather walks. A hike up the Merrick, when I was probably about seven years old, has gone down in family history as the day the rain never stopped. During the walk, we could rarely see more than 20m ahead and let’s just say that the view from the top was shades of grey…

Another one that sticks in my memory is a hike we did on a holiday to America. We’d been walking for hours, zig-zagging up through beautiful forests and lush meadows, but just as we reached the crest of the summit ridge, a thunderstorm drew in. Rather than turning around and hiking back down, we retreated a hundred metres down the path and huddled miserably in the rain while the path below our feet turned into a stream and lightning flashed overhead. But the thunderstorm passed and, in its wake, we submitted the peak and were rewarded with beautiful views.

There can be a fine balance between going out in weather that is safe but a bit miserable and weather that’s downright dangerous. Where you draw that line will depend on your level of outdoor experience, the type of activity you’re doing and the weather forecast, and is up to you to decide. Err on the side of caution, but don’t be put off by a bit of rain.

2. It’s Good Training

When I used to train with a search and rescue team, one of our training officers had the motto, “If it ain’t raining, it ain’t training”. There is truth to this, in that training in bad weather is good preparation for races or other adventures when you’re not sure what the weather conditions will be like. (And let’s face it, if that event is in the UK, even in summer you can’t guarantee sunshine.)

If you train in bad conditions, then if the weather isn’t ideal on the day of the event, you won’t be thrown by this because you’ve prepared and trained for that eventuality. And if you do get a good weather day, then you’ll appreciate it all the more!

3. You Get to Properly Test Your Kit

There was a reason you bought that £300 waterproof, right? And if you never go out in the rain, how will you know if it was worth the money?

In all seriousness, and going back to the point above, if you’re training for an event that could be affected by wet weather, you MUST test out how your kit will work under those weather conditions. Midnight on the overnight camp of your first mountain marathon isn’t the time you want to find out that your tent leaks!

You also need to work out how your body responds to different weather conditions, particularly wind and cold, so you can make sure you wear the right kit and have spare layers packed.

4. You’ll Feel Better for Having Done It

When the rain’s lashing on the windows, it can be really tempting to scrap your outdoor plans in favour of curling up inside with a nice cup of tea. And if you can do this without feeling the teeniest bit guilty, then good on you. But for most people, you’ll feel better for getting out, if only for a quick breath of fresh air. There’s nothing more rewarding than a long hot shower and a mug of hot chocolate after a long hike in the rain. And you’ll sleep better for it too.

5. Rainy Days Can Be the Most Beautiful

There’s a reason photographers love mixed weather days. Unexpected rainbows, shafts of sunlight through dark clouds and dramatic, moody lighting can transform even the plainest landscape into something quite beautiful. Many of these moments come and go within minutes or even seconds, and if you hadn’t have been outside, you’d never have seen them. So, if the forecast is for rain or showers and you’re not sure whether to go out or stay at home, then go. Nature herself may reward you.

Five tips for walking in the rain

Here are my top tips for hiking, running or biking in bad weather:

  1. Invest in good waterproofs. If it’s torrential rain, nothing will keep you totally dry, but a decent pair of waterproofs will mean the difference between an enjoyable day out and a miserable, soggy experience.
  2. Choose the right route. Today may not be the best day to tackle that exposed ridge scramble or do a long circuit of high peaks. Going out in bad weather doesn’t mean ignoring the forecast and you may need to adjust your original plans to take into account the weather conditions. A low-level, straightforward route will probably be a more enjoyable experience and avoid potential epics. Also, pick a route that’s easy to navigate, so you don’t have to faff around with maps or GPS units in the rain.
  3. Plan a cafe stop (or keep moving). Standing eating soggy butties in the rain isn’t much fun. So if you’re going for a long walk, see if you can plan in a stop for food at a cafe or pub. If there’s nothing on route, then consider taking lots of snacks that you can eat quickly, and keep moving so you don’t get cold.
  4. Take a friend for motivation. If you’ve got someone to chat to, this will take your mind off the weather and make the miles fly by. You can keep each other’s spirits up if things start getting a bit damp and motivate each other to keep going.
  5. Stock up on podcasts. This may be a controversial one, and for many people (myself included a lot of the time), getting outside is about getting away from everything else and just enjoying being in nature. But as I found this weekend, if you’ve got your hood up against the driving rain and you’re plodding along a familiar route, listening to something fun and entertaining is a great way to both take your mind off the weather and make you walk a little faster. I selected a variety of podcasts, including my current addiction, Limetown, and tucked my phone into my trouser pocket under my waterproof overtrousers to keep it dry. My 16 km canal walk flew by.

I hope that’s encouraged you to get out and enjoy the outdoors whatever the weather! If you’re going backpacking, then check out my tips on camping in the rain. And if you’ve got more tips for getting outside in wet weather, please post them in the comments below.

5 of the Best Mountain Challenges in the UK

Best mountain challenges in UK

The Cuillin Ridge – one of the UK’s toughest mountain challenges

If the grey days and dark nights are draining your motivation for getting outside, then you need a challenge! While we may not have the towering snow-capped peaks of the Alps, the UK has a surprising range of mountain challenges for everyone from casual weekend walkers to skilled mountaineers and fleet-of-foot fell runners.

This isn’t a comprehensive list but if you’re after for some inspiration or itching for a new challenge, why not book in one of the UK’s best mountain challenges for 2018…

Yorkshire Three Peaks

The route linking the ‘Yorkshire Three Peaks‘ of Pen-y-ghent, Whernside and Ingleborough is an ideal first mountain challenge for fit walkers. The route starts and ends in Horton-in-Ribblesdale and is 24 miles with 1,585m of ascent. To complete the ‘challenge’ you need to walk it in under 12 hours.

The Yorkshire Three Peaks is very popular with charity groups and can get busy in the summer, so a good-weather day out of season is your best bet for avoiding the crowds in the car parks as well as on the hills. There are no technical difficulties, but it’s a long day and if the weather’s bad, you’ll need to be confident navigating in low visibility.

The Welsh 3000s

If you want to step up from the Yorkshire Three Peaks, the Welsh 3000s, also known as the “14 Peaks” will challenge the fittest hill walker. The official challenge requires an ascent of the 15 (yes, 15 not 14…) Welsh peaks over 3,000ft in 24 hours, without using any form of transport.

The traditional route starts on the summit of Snowdon (sometimes with a bivvy) and finishes on Foel-fras. It’s around 24 miles long but the approach walk and final descent take the total up to 30 miles. There aren’t many technical challenges, but you’ll need to be comfortable with the scrambling on Crib Goch and Tryfan and a very long day in the hills.

The Bob Graham Round

The Bob Graham is to fell runners what the Cuillin Ridge is to mountaineers. The 66-mile circuit of 42 of the highest peaks in the Lake District includes 8,200m of ascent and, to officially complete the Bob Graham Round, the circuit has to be done in 24 hours.

For many fell runners, completing the Bob Graham is a lifetime achievement requiring years of preparation. Only around 1 in 3 attempts are successful and most take place in the summer, to make best use of daylight. I’ve spent long days in the Lakes hiking just a handful of the 42 peaks and I actually struggle to comprehend HOW people can be fit enough to complete the challenge within the 24-hour time limit.

For those who’ve completed the Bob Graham Round, more challenges lie ahead in the Welsh and Scottish equivalents: the Paddy Buckley Round and the Ramsay Round.

The Cuillin Ridge

The Cuillin Ridge is the most prized of all British ridge climbs and arguably one of the best mountaineering challenges in Europe. It requires stamina, excellent navigation skills and the ability to move quickly and safely on complex terrain.

The ridge itself is 12km, but including the walk in and walk out you’re looking at a 25km route with 4,000m of ascent and descent. Although none of the climbing is harder than ‘Very Difficult’, there are large sections of exposed scrambling and easier climbing and to have any chance of success at the traverse, you’ll need to be comfortable soloing most of the ridge.

If you’re super fit then it’s possible to do the Cuillin Ridge in a day but many parties take two days and bivvy overnight, either at the start of the ridge or part-way along. On many British ridge climbs, route-finding is fairly straightforward — you just keep to the crest of the ridge. On my one excursion into the Cuillin (to date) I was surprised at the level of technical route finding required. For this reason, if you’re looking to attempt the ridge it’s worth reccying different sections of the route in advance.

The Munros

This one may take you more than a year! The record for completing all 282 Scottish mountains over 3,000ft is an impressive 39 days and 9 hours (set by Stephen Pike in 2010) and the women’s record of 77 days was set in 2017 by Lisa and Libby from Beauties and the Bog. For most people, bagging all the Munros is a lifetime achievement, but if you have a lot of time on your hands or easy access to the Scottish Highlands, it’s possible to tick them all in a year.

While most Munros aren’t technical climbs (only one — the Inaccessible Pinnacle — involves a graded rock climb), many involve long days in the remotest parts of the UK and mountain skills are a must. Find out more about the Munros in our guide to Scotland’s ultimate ticklist.